
5 Workarounds to Supercharge Microsoft Copilot Studio
While developing solutions using Copilot Studio at my company, I came across a few useful workarounds, so just sharing them here. Some of these might be fixed by Microsoft in the future, so please check the latest official Microsoft documentation for updates. And if you already know Copilot, feel free to jump straight to the workaround section.
What is Microsoft Copilot Studio?
Microsoft Copilot Studio helps you quickly build AI agent solutions. Here are the main highlights:
-
Copilot: You can use prompts to create AI agents, topics, agent flows, and more. This is a really helpful feature because normally we go through a lot of trial and error or rely on documentation and tools, but now AI is here to help build AI-based solutions. It saves a lot of time. Even if something goes wrong, you can just ask AI to fix it. Copilot is tightly integrated with the Studio.
-
Integrations: It’s well integrated with Microsoft services like Teams, OneDrive, Excel, Outlook, SharePoint, Dataverse, Azure SQL, Dynamics 365. And it doesn’t stop there — it also supports a good number of third-party services like Salesforce, Databricks, Snowflake, ServiceNow, Monday.com, Jira, HubSpot, and many more.
-
Knowledge Base: If your solution is based on an enterprise knowledge base, then good integration becomes even more important — including the ability to update and search it. Copilot Studio takes care of this. It supports SharePoint, OneDrive, Dataverse, Azure SQL, and third-party services like Snowflake, Salesforce, Zendesk, Databricks, and Confluence.
-
Tools: It supports 1094 tools (as of July 5, 2025), and each service has its own set of actions. For example, OneDrive has actions like Create File, List Files, Get File, and more. If that’s not enough, it also supports custom tools and MCP tools — enough to cover most use cases.
-
Multi-Agent: Yes, you can leverage multi-agent capabilities. Though it only supports dynamic orchestration for now, you’ll need to be careful with how you structure prompts — the agent selection is based on the description.
-
Topics: I really like how Microsoft identified the market need and introduced topics. They give agents more control and determinism, especially for edge cases — like what to do when the agent fails to understand, or when the user says something like “connect me to a human.” In such cases, a specific topic gets triggered and can route your valuable customer to a human via SharePoint or any other service.
-
Agent Flow: This allows you to create an agent flow where repetitive tasks are automated using external services, AI, and control logic — all combined to handle complex workflows.
Enough about the features — now let’s dive into the workarounds that you probably won’t find directly in the docs or on blogs. This section is more for developers who already know Copilot Studio and want to push it further.
1. Write Agent Output to a File
After a long reasoning session and conversation with your AI agent, you might want to store the output to OneDrive as a markdown file. So you go to the Tools tab and add the Create File tool from OneDrive. But at the end of the conversation, the agent throws this error:
I was unable to assign the input 'File Content' due to a failure in the assignment process.

What went wrong?
This is an inbuilt tool — you’d expect it to just work. But it doesn’t. After searching online and finding no solution, I finally came across this official doc which mentions that File Content expects binary input — not a string. I looked for a Power Fx function to convert a string to binary, but couldn’t find one.
Eventually, I found out that Power Automate supports base64ToBinary, and since agent flows are based on Power Automate, here’s what I did:
-
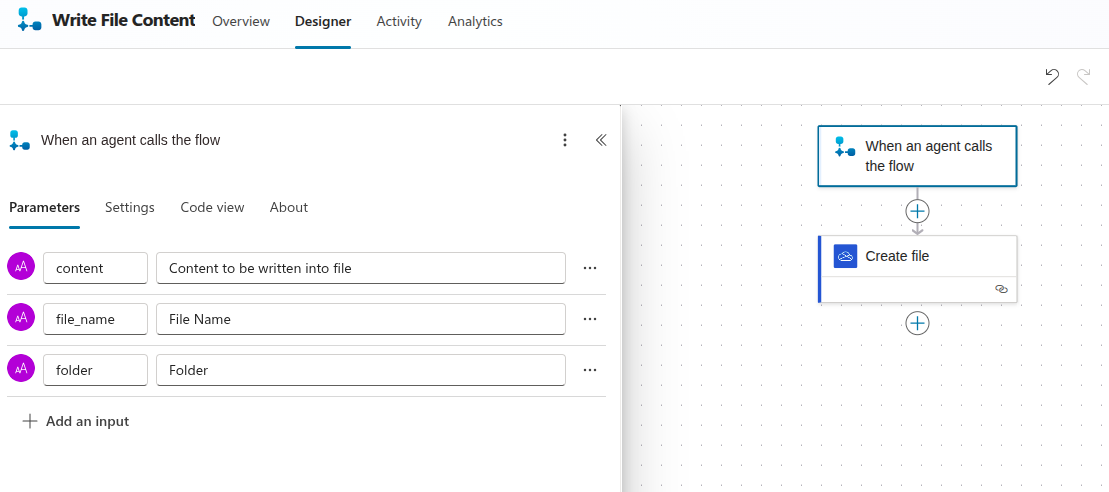
Create a new agent flow
-
Add a trigger: When an agent calls the flow
-
Add three parameters:
content(Text)file_name(Text)folder(Text)
-
Add the
Create Fileaction from OneDrive -
Configure it:
- Folder Path: use the lightning bolt icon to map
folder - File Name: map to
file_name - File Content: click the fx icon, paste
base64ToBinary(base64()), move the cursor insidebase64()and insert thecontentparameter. For me it looked like:base64ToBinary(base64(triggerBody()?['text']))
- Folder Path: use the lightning bolt icon to map
-
Publish the flow
-
Go to the Overview tab and test the flow using
Run -
Once it works, go to the agent's Tools tab and add this flow as a tool
2. Append Agent Output to a File
Let’s say multiple agents are collaborating on the same file. One posts questions, another answers them. But using Create File or Update File will overwrite everything. There’s no direct way to append content right now.
So again, we use Power Automate.
-
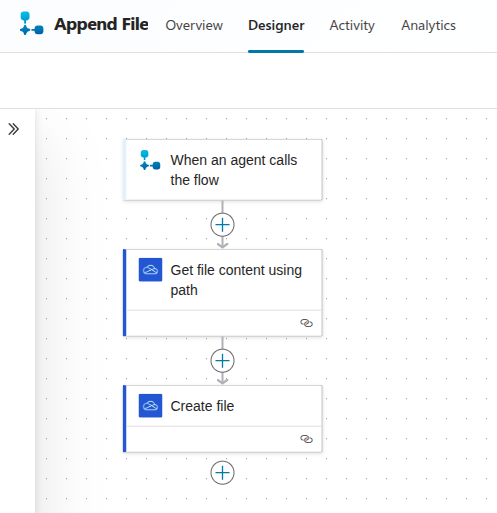
Create a new agent flow
-
Add the trigger: When an agent calls the flow
-
Add these parameters:
content(Text)file_name(Text)folder(Text)
-
Add
Get file content using pathfrom OneDrive with path as:concat('/', triggerBody()?['text_2'], '/', triggerBody()?['text_1'])where
text_1is the file name andtext_2is the folder -
Add
Create Fileaction and for content use:concat(body('Get_file_content_using_path'), triggerBody()?['text']) -
Publish the flow
Now your agent can append content to an existing file.
3. Use Azure AI Foundry Models in Copilot Studio
To build cutting-edge solutions, sometimes you want to use models like DeepSeek, Codex, or OpenAI’s o3 — but Copilot Studio doesn’t expose them directly. It currently supports GPT-4o, GPT-4.1 mini, and o1 (for deep reasoning).
However, I discovered a workaround using Prompt Tool + Azure AI Foundry, which allows connecting to any custom model:
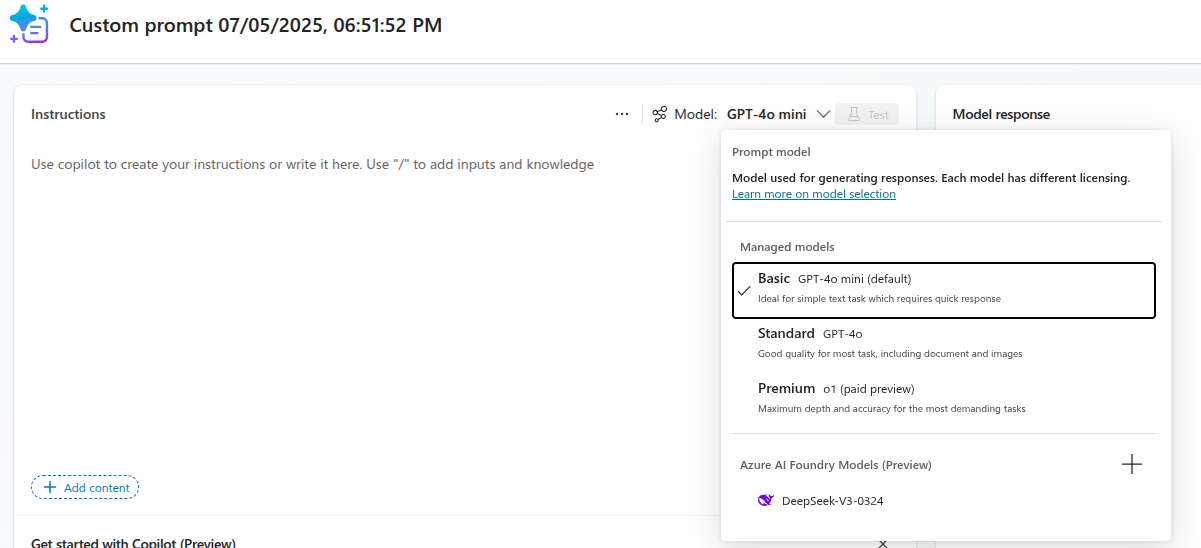
- Go to the Tools tab
- Click New Tool > select Prompt
- Under model dropdown, click
+to connect a new model from Azure AI Foundry - Fill in details like name, description, endpoint, and API key
- Save it and use it as a tool or in a topic flow
4. Connect Agent Outputs as a Dynamic Knowledge Base
I wanted agents to be aware of each other — so that they’re all on the same page. Now that we can create and append files, let’s connect the folder where they write as a knowledge base.
- Go to the agent
- Open the Knowledge Base tab
- Add a OneDrive knowledge base and select the folder (not individual files)
That’s it. Now your agent is backed by a dynamic and collaborative knowledge base.
5. Parameterize Prompts
Dynamic prompts make agents more flexible. Copilot supports Power Fx and lets you use parameters inside prompts.
For example, if you want to include the last message as part of your prompt:
LastMessage.Text
You can also reference other variables, like the chat name, and pass dynamic values to give your agent more context.
Conclusion
These workarounds came out of real struggles I faced while trying to build practical solutions with Microsoft Copilot Studio. Some things just didn’t work as expected, and there wasn’t always a direct answer in the docs or forums — so I had to experiment, fail a bit, dig around, and then finally figure it out.
Copilot Studio is evolving fast, and while it’s already powerful, there are still gaps where a little creativity (or desperation) can go a long way. Hopefully, these tricks help you save some time or unlock something you didn’t know was possible.