
Leverage Azure Document Intelligence in Langflow and n8n
Use Azure Document Intelligence on Langflow and n8n
Azure Document Intelligence is a SaaS service which allows us to extract information from documents. You may ask, Why not just use general-purpose LLMs? But general-purpose LLMs are good with compiling documents rather than accurately extracting text and structure from documents, and DI has specialised and trained models for that purpose.
For example, if you want to ask a question or summarise a document, you can use general-purpose LLMs, but if you want to extract information (as it is) or perform OCR on documents like invoices, receipts, contracts, etc., then Azure Document Intelligence is the right tool for the job.
Okay, now you decided to use Azure DI, but how to integrate it into your workflow? In case you are using Langflow or n8n, then this blog will help you, but always keep an eye on the latest updates. And the audience for this blog is those who are familiar with Langflow or n8n and want to integrate Azure Document Intelligence into their workflow.
After reading this blog, you will find answers to the following questions:
- How to use Azure Document Intelligence in Langflow?
- How to add custom components in Langflow?
- How to use Azure Document Intelligence in n8n?
Prerequisites:
- Azure Document Intelligence account
- Langflow or n8n installed
What’s Supported
Before diving in, I just want to give you a quick snapshot of what’s currently working (at the time of writing this — things might get better later if Microsoft, Langflow, or n8n push updates).
- Azure provides SDKs for both Python and JavaScript. That said, the JavaScript one is a bit of a mess — for example, the docs mention
poller.pollUntilDone, but that’s not even available in version 1.1.0, so you’ll hit an error right away. - Azure Document Intelligence (DI) also gives you the option to use REST APIs directly.
- Langchain supports Azure DI, but only through Python.
- Langflow can run Langchain Python code, which is super helpful.
- n8n lets you write code in both Python and JavaScript, but there’s a catch:
- You can’t use external libraries with Python (for more info python support in n8n)
- JavaScript, on the other hand, does allow external libraries (for more info)
- Also, n8n only supports Langchain’s JavaScript version — not the Python one. (for more info langchain code node)
So, what’s the smarter choice?
Honestly, going with Langflow is just smoother. It supports Langchain Python code, and you can bring in external libraries without a hitch.
If you’re set on using n8n, you’ll need to take the manual route — either call the Azure DI REST API using HTTP nodes, or write your own JavaScript logic inside a Code node.
One last note: we're skipping the JavaScript version of Langchain here because the Azure DI SDK for JavaScript isn’t fully there yet — it’s kind of unstable and lacking important features.
Quick tip before you start — check if Langflow or n8n have added Azure DI support through an official or community node. If not, the steps below will help you get things working.
Langflow
The reason I like Langflow is the switch between code and visual programming. In my experience, I have seen many products which focus on low code or no code, but they eventually fail to provide flexibility, and not just that; after switching to a low code platform, you can no longer use AI at full potential. But Langflow is different; if you think that model API version is not present in the dropdown, then just go and add a new one, or if a new experimental feature is still not released by Langflow, then go and edit the existing node or create a new node, and here you will use that power to create a custom node easily (compared to n8n, in this type of use case, Langflow is much better).
Before we start, we need to install the below packages in your Langflow environment:
pip3 install azure-ai-documentintelligence- Click on
+ New Flowor go to the existing flow. - Click on
+ New Custom Componentlocated at the bottom left corner. - Click on
Codelocated at the top left corner of the custom component.
Now, before pasting code, I will give a little tour to understand so you can plug various input and output to the custom node.
Input: class variable inputs is used to define the type of inputs this component will accept, like MessageTextInput, which we can connect to other nodes, or just StrInput, which is just a string input without connection, or DropdownInput and FileInput. All those will give different UI elements, and to know more about input, check out available inputs.
And if you wonder how we can access input in our function, then look for the name field, which will be available to your function using self. If the input name is model_id, then use self.model_id to access it.
Output: class variable outputs is used to define the type of outputs this component will produce, and with the output variable, we can connect which process method will produce this output.
- Paste the following code in the code editor:
import os
from langflow.custom import Component
from langflow.template import Output
from langflow.io import FileInput, StrInput, DropdownInput
from langchain_community.document_loaders import AzureAIDocumentIntelligenceLoader
from langflow.inputs.inputs import MessageTextInput
from langflow.base.models.model import LCModelComponent
from langflow.schema import Data

models = [
    "prebuilt-layout",
    "prebuilt-read",
    "prebuilt-contract",
    "prebuilt-healthInsuranceCard.us",
    "prebuilt-idDocument",
    "prebuilt-invoice",
    "prebuilt-receipt",
    "prebuilt-marriageCertificate.us",
    "prebuilt-creditCard",
    "prebuilt-check.us",
    "prebuilt-payStub.us",
    "prebuilt-bankStatement",
    "prebuilt-mortgage.us.1003",
    "prebuilt-mortgage.us.1004",
    "prebuilt-mortgage.us.1005",
    "prebuilt-mortgage.us.1008",
    "prebuilt-mortgage.us.closingDisclosure",
    "prebuilt-tax.us",
    "prebuilt-tax.us.w2",
    "prebuilt-tax.us.w4",
    "prebuilt-tax.us.1040",
    "prebuilt-tax.us.1095A",
    "prebuilt-tax.us.1095C",
    "prebuilt-tax.us.1098",
    "prebuilt-tax.us.1098E",
    "prebuilt-tax.us.1098T",
    "prebuilt-tax.us.1099",
    "prebuilt-tax.us.1099SSA",
]


class AzureDocIntelComponent(Component):
    display_name = "Azure Document Intelligence"
    description = "Extracts text from documents using Langchain's AzureAIDocumentIntelligenceLoader"
    icon = "file-text"
    name = "AzureDocIntel"

    inputs = [
        FileInput(
            name="file_path",
            display_name="Document File",
            file_types=["pdf", "png", "jpg", "jpeg"],
        ),
        StrInput(name="endpoint", display_name="Azure Endpoint"),
        StrInput(name="api_key", display_name="API Key"),
        StrInput(name="model_id", display_name="Model ID", value="prebuilt-layout"),
        DropdownInput(
            name="model_id",
            display_name="Model ID",
            options=models,
            value=models[0],
            info="Select the model to use",
            real_time_refresh=True,
        ),
    ]

    outputs = [
        Output(
            name="extracted_text", display_name="Extracted Text", method="extract_text"
        )
    ]

    def extract_text(self) -> Data:
        if not os.path.exists(self.file_path):
            raise FileNotFoundError(f"File not found: {self.file_path}")

        loader = AzureAIDocumentIntelligenceLoader(
            api_endpoint=self.endpoint,
            api_key=self.api_key,
            file_path=self.file_path,
            api_model=self.model_id,
        )

        documents = loader.load()
        ocr_text = "\n\n".join([doc.page_content for doc in documents])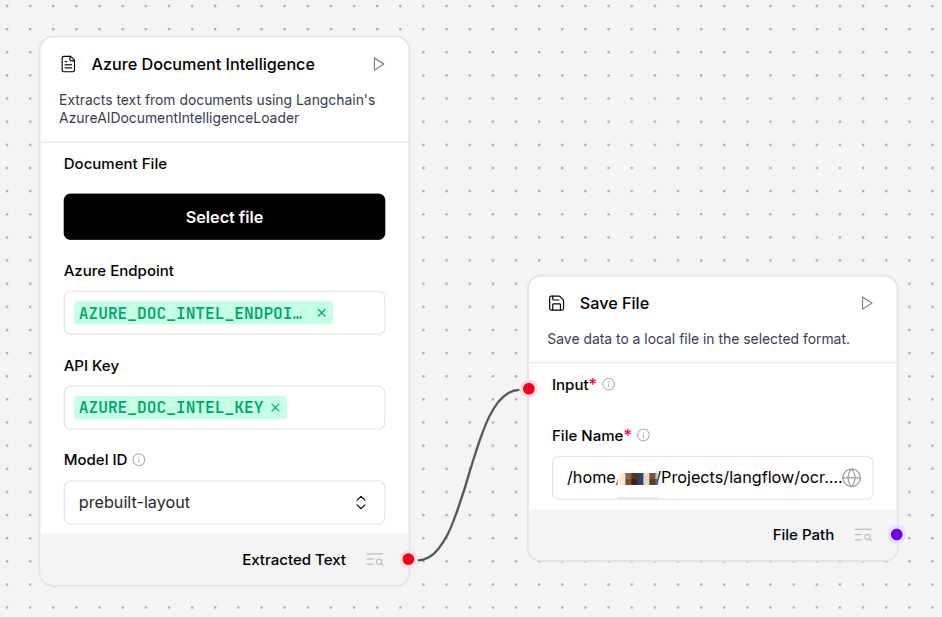
return Data(text=ocr_text)- Inputs are document picker and DI endpoint, API key and model ID dropdown (you can add a new model if into the
modelslist). - Output is
extracted_text, which is produced by theextract_textmethod. Here we are returning text as aDataobjec (json), but you can just return a string as well.
-
After checking & saving, place your endpoint and API key and test out.
-
Now you have two options to save this custom component.
I. A simple and quick way in case you don't want to include it as part of Git and share it with others,
Click on the custom component and the three dots at the top right corner, and then click on
Save. Now your new custom component will be available in theSavedcategory; try searching for your component.II. Save the code in your local folder as below:
/app/custom_components/                   # LANGFLOW_COMPONENTS_PATH
    └── Azure/                            # Displayed within the "Azure" menu
        └── azure_doc_intel_component.py  # Your component
Now there are two way to let langflow know your custom component path
- set the environment variable
LANGFLOW_COMPONENTS_PATHto/app/custom_components/
export LANGFLOW_COMPONENTS_PATH=/app/custom_components/- when executing langlfow command use the
--components-pathoption.
langflow --components-path /app/custom_components/ - set the environment variable
n8n
n8n is a fantastic tool — no doubt about that. But from my experience, it’s not the most flexible when it comes to customizing things. I wish it allowed us to tweak existing nodes or build custom ones as easily as Langflow does. That would’ve made life so much easier. But for now, when working with something like Azure Document Intelligence, we’re pretty much stuck using the Code node to make REST API calls.
Initially, I thought I could use the built-in HTTP node — seems like the logical choice, right? But then came the issues: polling, waiting, checking the status, handling errors... and that’s where it gets messy, especially if you’re new to n8n or just want something quick and straightforward. Plus, don’t expect too much help from AI — even tools like n8nchat (which lets you build workflows via prompts) aren’t quite there yet in terms of accuracy.
So yeah, let's go the JavaScript Code node route.
Now, here’s something important: for security reasons, n8n doesn’t allow external libraries in code nodes by default. If you want to use something like axios, you’ll need to explicitly allow it by setting the NODE_FUNCTION_ALLOW_EXTERNAL environment variable.
export NODE_FUNCTION_ALLOW_EXTERNAL=axiosAnd of course, you’ll need to install axios in your n8n environment:
npm install axiosOnce that’s done, here’s how you can get started:
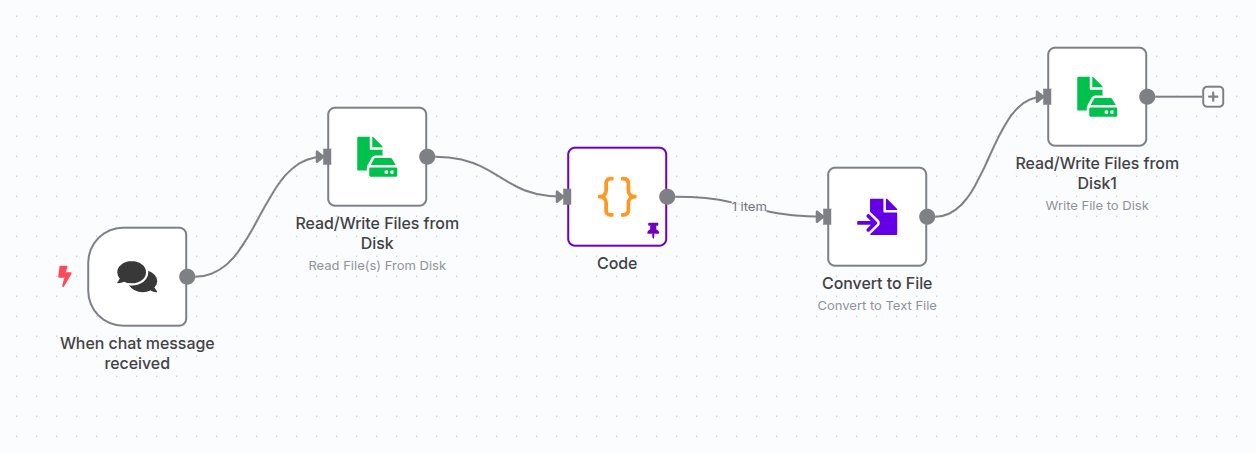
- Create a new workflow (or open an existing one).
- Add a trigger — this could be a webhook, a form submission, or anything else that makes sense for your use case.
- For testing, I’m using the “Read File from Disk” node with a hardcoded document path.
- Add a
Codenode and set the language to JavaScript. - Paste the following code into the editor:
// Get file binary data from previous node (Read File from Disk)
const binaryData = $input.first().binary.data.data;
if (!binaryData) {
  throw new Error("No file binary data found.");
}

// Azure Document Intelligence config
const endpoint = "<endpoint>"; // Replace with your Azure endpoint
const apiKey = "<key>"; // Replace with your Azure API key
const modelId = "prebuilt-layout";
const apiVersion = "2024-11-30";

// Load axios
const axios = require("axios");

// Step 1: Prepare request
const analyzeUrl = `${endpoint}documentintelligence/documentModels/${modelId}:analyze?_overload=analyzeDocument&api-version=${apiVersion}`;

const requestBody = {
  base64Source: binaryData, // already base64 string
};

const uploadResponse = await axios.post(analyzeUrl, requestBody, {
  headers: {
    "Content-Type": "application/json",
    "Ocp-Apim-Subscription-Key": apiKey,
  },
});

const operationLocation = uploadResponse.headers["operation-location"];
if (!operationLocation) {
  throw new Error("No operation-location header returned from Azure.");
}

// Step 2: Poll for result
let result;
let attempts = 0;
const maxAttempts = 10;

while (attempts < maxAttempts) {
  await new Promise((resolve) => setTimeout(resolve, 2000)); // wait 2 seconds

  const pollResponse = await axios.get(operationLocation, {
    headers: {
      "Ocp-Apim-Subscription-Key": apiKey,
    },
  });

  if (pollResponse.data.status === "succeeded") {
    result = pollResponse.data;
    break;
  } else if (pollResponse.data.status === "failed") {
    throw new Error("OCR processing failed.");
  }

  attempts++;
}

if (!result) {
  throw new Error("OCR result not ready after polling.");
}

// Step 3: Extract text
const text = result.analyzeResult?.content || "No text found.";

return { text: { text } };- After running the step, you can pin the output. This way, you won’t hit the API every time you execute the workflow — super useful when you’re building and debugging. Saves time, and avoids unnecessary API calls.
Conclusion
In this post, we explored how to use Azure Document Intelligence with both Langflow and n8n. On the Langflow side, we created a custom component, while in n8n, we used the JavaScript Code node to call the Azure Document Intelligence REST API.
This setup allows you to pull structured text from documents — like invoices, receipts, contracts, and more — and plug that data directly into your automation workflows. Whether you're parsing docs or building smarter flows, this combo gives you a lot of power with just a bit of setup.